|
|
| (16 intermediate revisions by 7 users not shown) |
| Line 1: |
Line 1: |
| {{Dungeon Boss | | {{NPCInfobox |
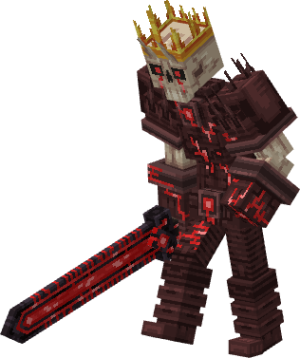
| | title = Pyro | | | title = Pyro;Spirit Of Fire |
| | | | image = 3DPyro.png;PyroBossBar |
| Spirit of Fire | | | Health = 1210 |
| | image = [[File:Pyro.png|968px]] | | | Fame = 150 |
| | Health = 1000 | | | Tiered = 6-7 |
| | Treasure = Yes | | | Gilded = |
| | | Abilities; Orb Of Torment; Ut-OrbOfTorment.png; 12, |
| <!--TIERED SECTION START-->
| | Abilities; Bomb Of Torment; Ut-BombOfTorment.png; 12, |
| | | Armours; Chestplate Of Torment; Ut-ChestplateOfTorment.png; 12 |
| | Tiered = [[Loot | T6 Equipment]][[File:T6HeavyChestplate.png|30px]]<br> | | | Companion = |
| | | Pets;Pryoc; 2DPryoc.png; 1, |
| [[Loot | T7 Equipment]][[File:T7HeavyChestplate.png|30px]]
| | Mounts; Hydroscorch; 2DHydroscorch.png; 1 |
| | | | Frag = Irradiated;25 |
| <!--TIERED SECTION END-->
| | | Required = 30 |
| <!--COMPANION SECTION START-->
| | | Solo = 30 |
| | CChance = 1/150
| |
| | Companion = [[Pets | Pryoc]][[File:Pryoc.png|30px]]<br>
| |
| | |
| [[Mounts | Hydroscorch]][[File:Hydroscorch.png|30px]]
| |
| | |
| <!--COMPANION SECTION END-->
| |
| <!--ROYAL SECTION START-->
| |
| | |
| | RChance = 1/40 | |
| | Royal = [[Abilities | Orb of Torment]][[File:OrbOfTorment.png|30px]]<br>
| |
| | |
| [[Abilities | Bomb of Torment]][[File:BombOfTorment.png|30px]]<br>
| |
| | |
| [[Armours | Chestplate of Torment]][[File:ChestplateOfTorment.png|30px]]
| |
| | |
| <!--ROYAL SECTION END-->
| |
| <!--FRAGMENT & TIER POINT SECTION START--><!----------------------------------------------------------------- PICK THE CORRECT FRAG TYPE IF APPLICABLE ----------------------------->
| |
| | |
| | |
| | TP = 30 TP | |
| | SoloTP = 30 TP | |
| | |
| <!--FRAGMENT & TIER POINT SECTION END-->
| |
| | |
| }} | | }} |
|
| |
|
| <!-------------------------------------Short Dungeon Description Below-----------------------------------> | | <div class="hoverbox"> |
| | | == Dungeon Data == |
| The essence of hell's flames resides within Pyro, raging and infecting the surrounding caves. | | The essence of hell's flames resides within Pyro, raging and infecting the surrounding caves. |
|
| |
|
| ==Pyro, Spirit Of Fire==
| | This dungeon is dropped by [[Fire Wormling]] and [[Fire Bombling]] in the [[Crimson Forest]]. |
| <div style="width: 100%;">
| |
| <div style="float: left;">
| |
| </div> | | </div> |
| <div style="float: left; margin-left: 2%; width: 40%;">
| |
|
| |
|
| ==Boss Patterns== <!------------------Make sure to indent a space for each pattern------------> | | <div class="hoverbox"> |
| | <div class="dungeon-clear"> |
| | == Dungeon Clear == |
| | * Go through the dungeon while clearing the rooms until you find the entrance to the boss arena, which is a hole in the ground. |
| | * This dungeon has a chance to spawn a highlighted chest, which gives you the chance to drop all the same items that the boss drops. |
| | </div> |
| | </div> |
|
| |
|
| Pyro summons fiery jewels around himself that shoot fiery bullets at the player.
| | <div class="hoverbox"> |
| | <div class="pre-dungeon"> |
| | == Boss Behaviour == |
| | <!------------------Make sure to indent a space for each pattern------------> |
| | '''(Attack 1)''' | Pyro summons three fiery jewels that orbit around him and launch projectiles at the player. The projectiles deal damage on impact. |
|
| |
|
| Pyro levitates and fires smokey shots at the player. These shots rebound in the air and turn to the player’s direction after a short time.
| | '''(Attack 2)''' | Pyro rises into the air and fires projectiles at the player. These shots rebound midair and curve back toward their target after a short delay. Afterwards, he slams his sword into the ground, sending out rippling shockwaves that deal AoE damage. |
|
| |
|
| Pyro dashes towards the player, dealing contact damage.
| | '''(Attack 3)''' | Pyro dashes toward the player, dealing contact damage on impact. |
|
| |
|
| Pyro sends a vertical slash towards the player.
| | '''(Attack 4)''' | Pyro swings his sword downward in a vertical slash aimed at the player, dealing damage on hit. |
|
| |
|
| ===Boss Phases===
| | '''100% to 50% (Phase 1)''' | Pyro cycles through his main attacks listed above in order to damage the player. |
| | |
| 50% | Pyro absorbs the flames of purgatory, exalting himself.
| |
|
| |
|
| | '''50% to 0% (Phase 2)''' | Pyro absorbs the flames of purgatory, exalting himself and his attacks. All of his attacks now deal burning damage as well, as he cycles through his main attacks. |
| </div> | | </div> |
| </div> | | </div> |
|
| |
|
| <div style="float: left; width: 100%;"> | | <div class="hoverbox"> |
| ==Dungeon Enemies== | | == Dungeon Enemies == |
| | | <div class="dungeon-enemies"> |
| <div style="float: left;"> | | {{NPCInfobox |
| {{Dungeon Enemy | | | title = Dark Demon Tower |
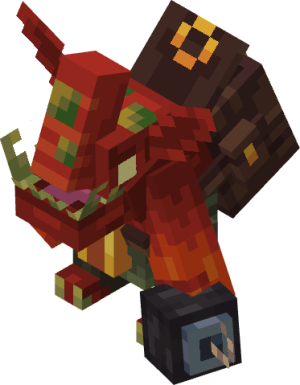
| | title = Fire Demonling | | | image = 3DDarkDemonTower.png |
| | image = FireDemonling.png | | | Attack = Releases eight projectiles in all directions. Each projectile deals damage on contact. |
| | Attack = | | | Health = 110 |
| | Health = | | | Fame = 20 |
| }} | | }} |
| </div>
| | {{NPCInfobox |
| <div style="float: left;">
| |
| {{Dungeon Enemy | |
| | title = Fire Bombling | | | title = Fire Bombling |
| | image = FireBombling.png | | | image = 3DFireBombling.png |
| | Attack = | | | Attack = Throws a bomb at the player that explodes on impact, dealing AoE damage and causing knockback. |
| | Health = | | | Health = 110 |
| | | Fame = 20 |
| }} | | }} |
| </div>
| | {{NPCInfobox |
| <div style="float: left;">
| | | title = Fire Dragonling |
| {{Dungeon Enemy | | | image = 3DFireDragonling.png |
| | | Attack = Rushes toward the player and attacks at close range, dealing melee damage. |
| | | Health = 99 |
| | | Fame = 20 |
| | }} |
| | {{NPCInfobox |
| | title = Fire Wormling | | | title = Fire Wormling |
| | image = FireWormling.png | | | image = 3DFireWormling.png |
| | Attack = | | | Attack = Shoots a red projectile at the player. The projectile deals damage on impact. |
| | Health = | | | Health = 71 |
| | | Fame = 20 |
| }} | | }} |
| </div> | | </div> |
| <div style="float: left;">
| |
| {{Dungeon Enemy
| |
| | title = Dark Demon Tower
| |
| | image = DarkDemonTower.png
| |
| | Attack =
| |
| | Health =
| |
| }}
| |
| </div> | | </div> |
|
| |
|
| | <div class="hoverbox"> |
| | <div class="lore"> |
| | == Lore == |
| | <!------------------Do not touch unless authorized by lorers------------> |
| | {{DLog|???|Pyro|???}} |
|
| |
|
| <div style="float: left; width: 100%;"> | | <!--Boss Dialogue Drop Down--> |
| | {{ButtonHeader |
| | |type=Dialogue |
| | |text=Boss & Dungeon Dialogue |
| | |img= |
| | |content= |
| | <tabber> |
| | English Dialogue= |
| | {| class="wikitable" |
| | |+ Clear |
| | |- |
| | ! Trigger !! Dialogue |
| | |- |
| | | Approaching a Chest || [Purgatory Chest] "Let's see what you will find inside!" |
| | |} |
| | {| class="wikitable" |
| | |+ Bossfight |
| | |- |
| | ! Trigger !! Dialogue |
| | |- |
| | | Arrival || [Pyro] "...In the depths... A flame is alight..." |
| | |- |
| | | Phase 1 End || [Pyro] "...The flicker becomes an inferno..." |
| | |- |
| | | 25% Boss HP || [Pyro] "...And the flames burn brightly..." |
| | |} |
| | </tabber> |
| | }} |
| | </div> |
| | </div> |
|
| |
|
| {{Navbox
| | <div class="hoverbox"> |
| | name = Dungeon Navbox
| | ==Tips and Tricks== |
| | title = Dungeons
| | <div class="tipstricks"> |
| | listclass = hlist
| | * Try to stay far away from the boss in the second phase as to not get damaged by the fire. |
| | state = {{{state|collapsed}}}
| | </div> |
| | </div> |
|
| |
|
| | group1 = 6 Tier Points
| | {{Dungeon Navbox}} |
| | list1 = [[Pirate Cove]]
| |
| | |
| | group2 = 12 Tier Points
| |
| | list2 = [[Thornwood Wargrove]] • [[Goblin Lair]]
| |
| | |
| | group3 = 18 Tier Points
| |
| | list3 = [[Sakura Shrine]] • [[Secluded Woodland]] • [[Desert Temple]]
| |
| | |
| | group4 = 24 Tier Points
| |
| | list4 = [[Abyss Of Demons]] • [[Dwarven Frostkeep]] • [[Undead Lair]] • [[Treasure Cave]] • [[Ice Cave]]
| |
| | |
| | group5 = 30 Tier Points
| |
| | list5 = [[Depths Of Purgatory]] • [[Peaks Of Purgatory]] • [[Kobold's Den]] • [[Corvus Crypt]]
| |
| | |
| | group6 = 40 Tier Points
| |
| | list6 = [[Omnipotent's Citadel]] • [[Corsair's Conductorium]] • [[Fungal Cavern]] • [[Onyx's Castle]]
| |
| | |
| | group7 = 45 Tier Points
| |
| | list7 = [[Freddy's Pizzeria]] • [[Anubis Lair]] • [[Chronos]]
| |
| | |
| | group8 = 52 Tier Points
| |
| | list8 = [[Cultist's Hideout]] • [[Void]] • [[Illarius' Hideout]]
| |
| | |
| | group9 = 60 Tier Points
| |
| | list9 = [[Shattered Kingdom: Part 1]] • [[Onyx's Chamber]] • [[Shattered Kingdom: Part 2]]
| |
| | |
| | group10 = 60 Tier Points
| |
| | list10 = [[Celestial's Province]] • [[Shattered Kingdom: Part 3]]
| |
| | |
| | below = [[Main Page | Home]]
| |
| }} | |