imported>EmotionalDamage42 |
|
| (20 intermediate revisions by 6 users not shown) |
| Line 1: |
Line 1: |
| WARNING: Beating this dungeon allows access to the harder version, including the [[Dawn of Creation]] True Ophan bossfight, with drops from all parts of the dungeon and an exclusive unholy crafting material: the Pendant of Sin. To open the portal, you must consume a sigil of light.
| |
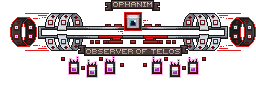
| {{NPCInfobox | | {{NPCInfobox |
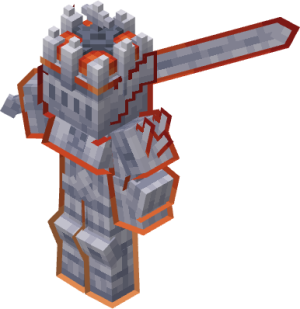
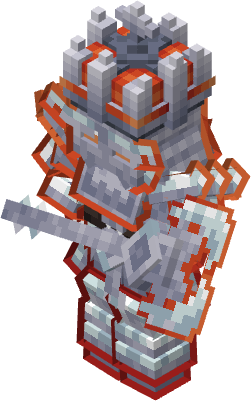
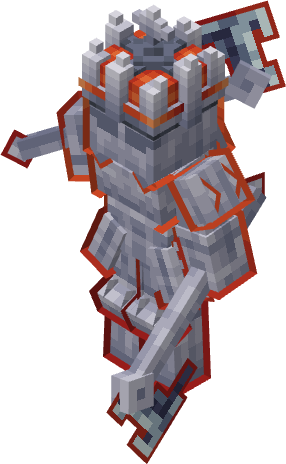
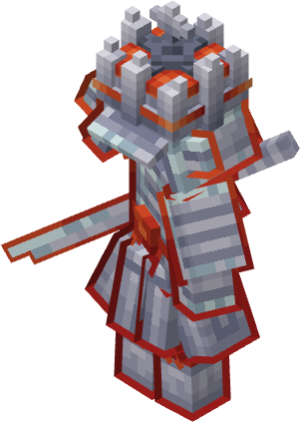
| |title=Ophanim; Observer of Telos | | | title = Ophanim;Observer of Telos |
| |image=OphanimBossbar.png | | | image = 3DOphanim.png;OphanimBossbar |
| |Health=22000 | | | Health = 22000 |
| |Tiered=11 | | | Fame = 5000 |
| | | Tiered = 11 |
| | | Bloodshot = |
| | Weapons; Oracle's End; Ut-Oracle'sEnd.png; 0.8, |
| | Weapons; Final Destination; Ut-FinalDestination.png; 0.8, |
| | Armours; Crown Of Ethereal Radiance; Ut-CrownOfEtherealRadiance.png; 0.8, |
| | |Companion= |
| | Pets; Lumine; 2DLumine.png; 0.2, |
| | Mounts; Astralflare; 2DAstralflare.png; 0.2 |
| | | Rune = |
| | Rune; Rune Of The Observer; Rune-RustbornKingdom.png; 3 |
| | | Frag = Bloodshot;20 |
| | | Required = 66 |
| | | Solo = 78 |
| | }} |
|
| |
|
| |Bloodshot=
| | <div class="hoverbox"> |
| Armours;Crown Of Ethereal Radiance;Ut-Crown.png;0.8,
| | == Dungeon Data == |
| | This dungeon is dropped by defeating [[Rustborn Kingdom: Part 2|Nebula]]. |
|
| |
|
| weapons;Oracle's End;Ut-oracle.png;0.8,
| | EXTRA INFO: Beating this dungeon allows access to the harder version, the [[Dawn of Creation]] True Ophan bossfight, with drops from all parts of the dungeon and an exclusive unholy crafting material: the Pendant of Sin. <br /> |
| | To open the portal, you must consume a Sigil of Eternal Light, obtained from being the highest damager of [[Raphael]] in [[Raphael's Chamber]]. |
| | </div> |
|
| |
|
| weapons;Final Destination;FinalDestination.png;0.8,
| | <div class="hoverbox"> |
| | | <div class="dungeon-clear"> |
| |Companion= Pets;Lumine;itemLumine.png;0.2,
| | == Dungeon Clear == |
| | | * Shoot meteors at the Enlightened enemies to break their shields. After this you can kill them. Repeat this once more to reach Ophanim. |
| Mounts;Astralflare;itemAstralflare.png;0.2
| | </div> |
| | </div> |
|
| |
|
| |Rune= Rune;Rune Of The Observer;ObserverRune.png;3
| | <div class="hoverbox"> |
| |Frag= Bloodshot;20
| |
| | |
| |Required=66
| |
| |Solo=78
| |
| }}
| |
| <div class="pre-dungeon"> | | <div class="pre-dungeon"> |
| ==Boss Phases== | | == Boss Behaviour == |
| <!------------------Make sure to indent a space for each pattern------------> | | <!------------------Make sure to indent a space for each pattern------------> |
| | '''(Set 1, Attack 1: Walls)''' | Ophanim's eyeball will lie down in the middle of the arena and summon walls that enclose within the player. Within the walls is a randomized gap that the player will need to go through to avoid taking damage. This is repeated multiple times. |
|
| |
|
| 100% to 85% (Phase 1) | Ophanim teleports to a random corner of the arena and 4 circles rotate around him shooting eyes and chevrons in all directions. Ophanim teleports to a random location in the arena every 12 seconds.
| | '''(Set 1, Attack 2: Eyeballs)''' | Ophanim will teleport to the middle of the arena and summon two rings of arrows which increase & decrease in diameter as the fight goes on that the player will need to stay in between of. In addition, eyeballs will travel towards Ophanim from the outskirts of the arena which damage the player on contact. |
|
| |
|
| 85% to 60% (Phase 2: Walls)| Ophanim flattens in the center of the circle as a semicircle of shots approaches the center from the ring, to dodge you have to find the gap.
| | '''(Set 2, Attack 1: Wheel)''' | Ophanim begins to roll toward a random point around the arena and bouncing off of the walls. Upon striking a wall, Ophanim shoots out a flurry of chevrons along with lines of black shots on each collision. This is repeated multiple times. |
|
| |
|
| 85% to 60% (Phase 2: Eyeballs) | Ophanim summons two sets of rotating chevrons that oscillate in and out throughout the phase. Eyes spawn from the ring and move towards Ophanim in the center.
| | '''(Set 2, Attack 2: America)''' | Ophanim teleports to the targeted player then unleashes two types of projectiles; the first being alternating waves of red and blue shots that rotate clockwise and counterclockwise respectively, and the second being smaller red and blue projectiles which are released in all directions. Upon reaching the end of their trajectory, these shots will slowly travel back towards Ophanim's previous location. Ophanim will repeat this four times, each time decreasing the amount of shots that are released, starting off with five shots. |
|
| |
|
| 60% to 40% (Phase 3: Clock) | Ophanim will teleport to the center of the map and transform into a golden clock. He will then shoot eyes in a spiral, followed by a flurry of shots, followed by a second spiral. Upon the clock striking midnight, the shots will freeze before returning to Ophanim at high speed. The best way to dodge when the clock hits midnight is to start looking away from ophanim to see the shots that are coming back to ophanim.
| | '''100% to 85% (Phase 1)''' | Ophanim teleports to a random corner of the arena and four circles rotate around him; the smaller shooting eyes in all directions, and the larger shooting chevrons in all directions. Ophanim then teleports to another random corner in the arena every twelve seconds. |
|
| |
|
| 40% to 15% (Phase 4: Wheel) | Ophanim begins to roll to 24 points around the arena bouncing off the walls and shooting out a flurry of chevrons along with lines of black shots on each collision. The flurry of chevrons and black shots are on a short cooldown of (0.3s) after collision.
| | '''85% to 60% (Phase 2)''' | Ophanim cycles through the attacks of Set 1 listed above in order to damage the player. |
|
| |
|
| 40% to 15% (Phase 4: America) | Ophanim teleports to his target before unleashing alternating waves of red and blue shots that rotate clockwise and counterclockwise respectively. Upon reaching the end of their trajectory these shots will convert into smaller shots which slowly travel towards the nearest player. Ophanim will fire 5 shots on his first teleportation followed by waves of 4, 3, then 2 shots.
| | '''60% to 40% (Phase 3: Clock)''' | Ophanim will teleport to the center of the map and transform into a golden clock. He will then shoot eyes in a spiral, followed by a flurry of shots, followed by a second spiral. Upon the clock striking midnight, the shots will freeze before returning to Ophanim at high speed. It is recommended to look back during the return in order to see the shots. |
|
| |
|
| 15% to 0% (Phase 5: Grid) | Ophanim will teleport all players into a black box surrounded with blinking eyes and spawn a rotating laser that covers the entire arena killing the player on contact. Ophanim then summons a grid along with wider lines which, upon turning red, deals a high amount of damage. To dodge you need to find the gaps, on top of that the wider lines also stun and deal around 30 damage | | '''40% to 15% (Phase 4)''' | Ophanim cycles through the attacks of Set 2 listed above in order to damage the player. |
| | |
| | '''15% to 0% (Phase 5: Grid)''' | Ophanim will teleport all players into a black box surrounded with blinking eyes and spawn a rotating big beam that covers the entire arena which kills the player on contact. Ophanim then summons a small grid and large grid; upon the gridlines turning red, they deal a huge amount of DPS. The larger gridlines deal an even higher amount of DPS, as well as stun the player. |
| </div> | | </div> |
| <div class="dlog>
| |
| <b>[D̷̛͖̲̜̤̭̤̬̏͑́̌̇̽͛̊́̕̚͜'s PERSONAL LOG: ???] BYPASS STATE:</b> ???
| |
| </div> | | </div> |
|
| |
|
| | <div class="hoverbox"> |
| == Dungeon Enemies == | | == Dungeon Enemies == |
| <div class="dungeon-enemies"> | | <div class="dungeon-enemies"> |
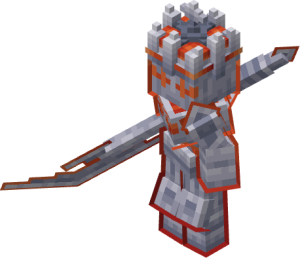
| {{NPCInfobox | | {{NPCInfobox |
| |title= Enlightened Paladin | | | title = Enlightened Paragon |
| |image= | | | image = 3DEnlightenedParagon.png |
| |Attack= One of the scariest enemies for clear, as its capable of dashing and after the dash it executes a 3 hit combo which can deal over 20 health worth of damage. | | | Attack = Sends horizontal slashes that have a long range, or summons spikes that extrude out of the ground that deal damage in a small radius. |
| |Health= 561 | | | Health = 594 |
| | | Fame = 80 |
| | }} |
| | {{NPCInfobox |
| | | title = Enlightened Gladiator |
| | | image = 3DEnlightenedGladiator.png |
| | | Attack = Sends vertical slashes towards the player, or slams the ground summoning an expanding puddle that deals a huge amount of DPS as well as inflicts slowness, or slashes the player if close. |
| | | Health = 583 |
| | | Fame = 80 |
| }} | | }} |
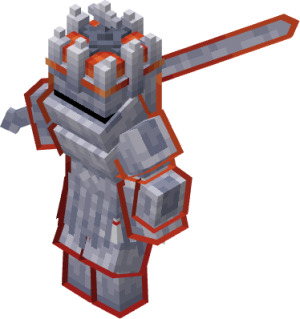
| {{NPCInfobox | | {{NPCInfobox |
| |title= Enlightened Gladiator | | | title = Enlightened Paladin |
| |image= | | | image = 3DEnlightenedPaladin.png |
| |Attack= Usually swings his sword however occasionally it summons a puddle that is extending outwards until it reaches its max distance and then starts to disappear after a bit. | | | Attack = Dashes towards the player then slashes the player up to 3 times, as well as occassionally slamming the ground, causing an explosion that deals AoE damage in a small radius. |
| |Health= 583 | | | Health = 561 |
| | | Fame = 80 |
| }} | | }} |
| {{NPCInfobox | | {{NPCInfobox |
| |title= Enlightened Kensei | | | title = Enlightened Templar |
| |image= | | | image = 3DEnlightenedTemplar.png |
| |Attack= Usually slashes his sword but can teleport to the direction of a player. | | | Attack = Shoots out a beam of light from their eyes that deal massive DPS, impale the player with their weapon, or slams the ground near the player dealing knockback. |
| |Health= 506 | | | Health = 539 |
| | | Fame = 80 |
| }} | | }} |
| {{NPCInfobox | | {{NPCInfobox |
| |title= Enlightened Templar | | | title = Enlightened Norseman |
| |image= | | | image = 3DEnlightenedNorseman.png |
| |Attack= It's main attack is its very dangerous eye laser which deals extremely high DPS however the laser isn't too hard to avoid. On top of that he can smash the ground with his battle axe. | | | Attack = Throws axes at the player, or summons ice spikes in the player's general direction. |
| |Health= 539 | | | Health = 517 |
| | | Fame = 80 |
| }} | | }} |
| {{NPCInfobox | | {{NPCInfobox |
| |title= Enlightened Norseman | | | title = Enlightened Kensei |
| |image= | | | image = 3DEnlightenedKensei.png |
| |Attack= He is capable of throwing axes and occasionally summons spikes of ice to damage the players in its AOE radius. | | | Attack = Slashes the air, sending a fast vertical slash, dashes towards the player and slashes them with a 3-hit combo, or initiates a 3-hit combo if close. |
| |Health= 517 | | | Health = 506 |
| | | Fame = 80 |
| }} | | }} |
| {{NPCInfobox
| |
| |title= Enlightened Paragon
| |
| |image=
| |
| |Attack= He sends a slash that is capable of reaching great distances and it can ocasionally summon spikes all around him as an AOE attack.
| |
| |Health= 594
| |
| }}
| |
| </div> | | </div> |
|
| |
|
| | <div class="hoverbox"> |
| | <div class="lore"> |
| | == Lore == |
| | <!------------------Do not touch unless authorized by lorers------------> |
| | {{DLog||Ophanim|What are you planning, Void...}} |
| | |
| | <!--Boss Dialogue Drop Down--> |
| | {{ButtonHeader |
| | |type=Dialogue |
| | |text=Boss & Dungeon Dialogue |
| | |img= |
| | |content= |
| | <tabber> |
| | English Dialogue= |
| | {| class="wikitable" |
| | |+ Clear |
| | |- |
| | ! Trigger !! Dialogue |
| | |- |
| | | Entrance || [Ophanim] "In the name of Zarithal! What unseen presence dares to intrude as this parasite kneels before me?" {{Sound|VA-OphanimClear1.ogg}} <br />[Voided King] "...Interesting." {{Sound|VA-OphanimClear2.ogg}} |
| | |- |
| | | Completed First Floor || [Ophanim] "Ohohoho! It’s the warriors that felled Loa." {{Sound|VA-OphanimClear3.ogg}} <br />[Ophanim] "Traitors of Telos! You have thrown quite the wrench in our plans!" {{Sound|VA-OphanimClear4.ogg}} <br />[Voided King] "…So the barrier has collapsed…curious…" {{Sound|VA-OphanimClear5.ogg}} <br />[Ophanim] "Oh, how curious indeed! Admittedly you fought well, King. But you will never beat an angel of the three choirs!" {{Sound|VA-OphanimClear6.ogg}} <br />[Voided King] "…Silverlings. Run away to your Nexus. I will deal with you another time." {{Sound|VA-OphanimClear7.ogg}} <br />[Ophanim] "I-...Silverlings? Nexus? Growing delirious at the face of death? There won’t be another time you twisted fool!" {{Sound|VA-OphanimClear8.ogg}} |
| | |- |
| | | Completed Second Floor || [Ophanim] "HAHAHA! And so they persist!" {{Sound|VA-OphanimClear9.ogg}} |
| | |} |
| | {| class="wikitable" |
| | |+ Bossfight |
| | |- |
| | ! Trigger !! Dialogue |
| | |- |
| | | Arrival || [Ophanim] "You have lost, Void. Make an example out of him!" {{Sound|VA-VA-OphanimClear10.ogg}} <br />[Voided Omnipotent] "It is done. The Void has been tamed." {{Sound|VA-VA-OphanimClear11.ogg}} <br />[Ophanim] "You are next, citizens of Telos!" {{Sound|VA-VA-OphanimClear112.ogg}} <br />[Ophanim] "REPENT/SHATTER!" {{Sound|VA-RustbornKingdomP3V1A.ogg}} {{Sound|VA-RustbornKingdomP3V1B.ogg}} {{Sound|VA-RustbornKingdomP3V2A.ogg}} {{Sound|VA-RustbornKingdomP3V2B.ogg}} <br />[Ophanim] "What do you fear more, warriors? Your opponent? Or the prison that binds your spirit?" {{Sound|VA-RustbornKingdomP3V3.ogg}} |
| | |- |
| | | Phase 1 End || [Ophanim] "You are truly powerless against the very fabric of time." {{Sound|VA-RustbornKingdomP3V4.ogg}} |
| | |- |
| | | Phase 2 End || [Ophanim] "And as the clock ticks forwards, your very resolve is tested against the hands of fate." {{Sound|VA-RustbornKingdomP3V5.ogg}} <br />[Ophanim] "But alas. Your time is up!" {{Sound|VA-RustbornKingdomP3V6.ogg}} |
| | |- |
| | | Phase 3 End || [Ophanim] "A/B/Nothing you can do, shall change the outcome." {{Sound|VA-RustbornKingdomP3V7A.ogg}} {{Sound|VA-RustbornKingdomP3V7B.ogg}} {{Sound|VA-RustbornKingdomP3V7C.ogg}} |
| | |- |
| | | Phase 4 End || [Ophanim] "Wait…*yawn*. that…sound…" {{Sound|VA-RustbornKingdomP3V8.ogg}} |
| | |- |
| | | 10% Boss HP || [Ophanim] "You…you backstabbing…" {{Sound|VA-RustbornKingdomP3V9.ogg}} <br />[Voided Omnipotent] "…" |
| | |- |
| | | 5% Boss HP || [Ophanim] "Maybe…it was just…meant to be…" {{Sound|VA-RustbornKingdomP3V10.ogg}} |
| | |- |
| | | Boss Death || [Ophanim] "A/Perhaps…perhaps a Cherubim will finish…what…I never…could…" {{Sound|VA-RustbornKingdomP3V11A.ogg}} {{Sound|VA-RustbornKingdomP3V11B.ogg}} |
| | |} |
| | </tabber> |
| | }} |
| | </div> |
| | </div> |
| | |
| | <div class="hoverbox"> |
| == Tips and Tricks == | | == Tips and Tricks == |
| <div class="tipstricks"> | | <div class="tipstricks"> |
| *For Clock it is advised that you have quite a bit of speed (around 50) though there isn't a "fixed" number for this, just whatever feels the best. | | * For Clock, it is advised that you have quite a bit of speed (around 50) however there is not a precise amount needed. |
| *During the entire boss fight you can spam space for move movement speed | | * During the entire boss fight, you can spam space for more movement speed. |
| | </div> |
| </div> | | </div> |
|
| |
|
| {{Dungeon Navbox}} | | {{Dungeon Navbox}} |