|
|
| (2 intermediate revisions by 2 users not shown) |
| Line 1: |
Line 1: |
| [[File:3DRoseElyrion.png|centre]] | | [[File:Trial-3DRoseElyrion.png|centre]] |
| <div class="hoverbox"> | | <div class="hoverbox"> |
| ==Daily Mission Data== | | ==Daily Trial Data== |
| The Mission of the Day is given to the player by Ragnar in [[The Nexus]]. | | The Mission of the Day is given to the player by Ragnar in [[The Nexus]]. |
|
| |
|
| Line 9: |
Line 9: |
| |+ Trial order | | |+ Trial order |
| |- | | |- |
| ! Day !! Daily Trial | | ! Day !! Trial |
| |- | | |- |
| | Monday || Trial of the Sapphire Flame | | | Monday || Trial of the Sapphire Flame |
| Line 27: |
Line 27: |
| </div> | | </div> |
| {{ButtonHeader | | {{ButtonHeader |
| |type=DailyMission | | |type=DailyTrial |
| |text=Daily Mission Merits | | |text=Daily Trial Merits |
| |img=Icon-SeasonPass | | |img=Icon-SeasonPass |
| |content= | | |content= |
| Line 73: |
Line 73: |
| |type=TrialoftheSwift | | |type=TrialoftheSwift |
| |text=Trial of the Swift | | |text=Trial of the Swift |
| |img=3DTreasureChest | | |img=Trial-3DTreasureChest |
| |content= | | |content= |
| <div class="hoverbox" id="Temple Run"> | | <div class="hoverbox" id="Temple Run"> |
| Line 109: |
Line 109: |
| |type=TrialoftheFlame | | |type=TrialoftheFlame |
| |text=Trial of the Flame | | |text=Trial of the Flame |
| |img=3DSapphireElyrion | | |img=Trial-3DSapphireElyrion |
| |content= | | |content= |
| <div class="hoverbox" id="Echoes of the Past"> | | <div class="hoverbox" id="Echoes of the Past"> |
| Line 121: |
Line 121: |
| <tabber> | | <tabber> |
| Trial of the Sapphire Flame= | | Trial of the Sapphire Flame= |
| [[File:3DSapphireElyrion.png|centre|link=]] | | [[File:Trial-3DSapphireElyrion.png|centre|link=]] |
| <div class="pre-dungeon"> | | <div class="pre-dungeon"> |
| '''(Phase 1)''' {{!}} Light blue projectiles spawn from the centre of the circle and travel outwards at a moderate speed. A blue flame will orbit near the outer edge of the allowed zone, spewing out blue projectiles in all directions. The glyph rotates slightly closer to the centre, in the opposite direction. | | '''(Phase 1)''' {{!}} Light blue projectiles spawn from the centre of the circle and travel outwards at a moderate speed. A blue flame will orbit near the outer edge of the allowed zone, spewing out blue projectiles in all directions. The glyph rotates slightly closer to the centre, in the opposite direction. |
| Line 135: |
Line 135: |
| |-| | | |-| |
| Trial of the Verdant Flame= | | Trial of the Verdant Flame= |
| [[File:3DVerdantElyrion.png|centre|link=]] | | [[File:Trial-3DVerdantElyrion.png|centre|link=]] |
| <div class="pre-dungeon"> | | <div class="pre-dungeon"> |
| '''(Phase 1)''' {{!}} Projectiles of varying directions spawn from two ends of the arena, travelling inwards. The glyph is stationary at the centre of the arena. | | '''(Phase 1)''' {{!}} Projectiles of varying directions spawn from two ends of the arena, travelling inwards. The glyph is stationary at the centre of the arena. |
| Line 149: |
Line 149: |
| |-| | | |-| |
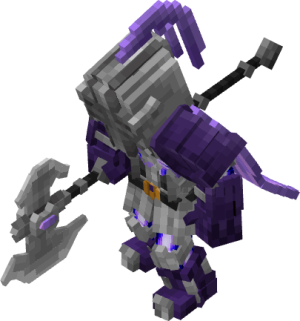
| Trial of the Rose Flame= | | Trial of the Rose Flame= |
| [[File:3DRoseElyrion.png|centre|link=]] | | [[File:Trial-3DRoseElyrion.png|centre|link=]] |
| <div class="pre-dungeon"> | | <div class="pre-dungeon"> |
| '''(Phase 1)''' {{!}} Projectiles spawn from two walls of the arena and travel inwards. An additional smaller zone circle that hits players within it spawns at the centre of the arena, leaving players effectively confined to a “donut” shape. A larger projectile that periodically emits eight fast moving projectiles orbits the centre of the arena, just outside of the outer circle. The glyph orbits the centre of the arena near the edge of the outer circle, in the opposite direction of the larger projectile. | | '''(Phase 1)''' {{!}} Projectiles spawn from two walls of the arena and travel inwards. An additional smaller zone circle that hits players within it spawns at the centre of the arena, leaving players effectively confined to a “donut” shape. A larger projectile that periodically emits eight fast moving projectiles orbits the centre of the arena, just outside of the outer circle. The glyph orbits the centre of the arena near the edge of the outer circle, in the opposite direction of the larger projectile. |
| Line 168: |
Line 168: |
| |type=TrialoftheGuardian | | |type=TrialoftheGuardian |
| |text=Trial of the Guardian | | |text=Trial of the Guardian |
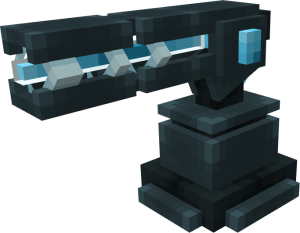
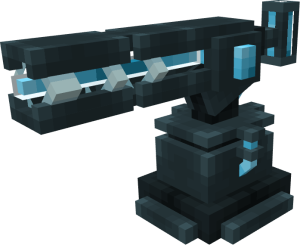
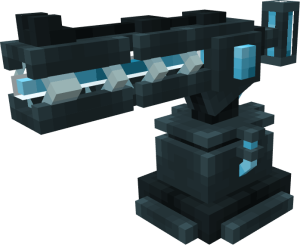
| |img=3DRailgunT3 | | |img=Trial-3DRailgunT3 |
| |content= | | |content= |
| <div class="hoverbox" id="Kurvaros' Tower Defense"> | | <div class="hoverbox" id="Kurvaros' Tower Defense"> |
| | | ==Objective== |
| ===Objective===
| |
| Protect the objective from an oncoming horde. | | Protect the objective from an oncoming horde. |
| The objective has 100 Health and 3 Lives, when all lives are lost you lose. | | The objective has 100 Health and 3 Lives, when all lives are lost you lose. |
| Line 184: |
Line 183: |
| 10 Waves of mobs will spawn from a portal, they walk on a path towards the objective. | | 10 Waves of mobs will spawn from a portal, they walk on a path towards the objective. |
|
| |
|
| (all) | | (All) |
| Each wave is harder than the last. | | Each wave is harder than the last. |
| Once every wave is defeated, the player wins. | | Once every wave is defeated, the player wins. |
| Line 191: |
Line 190: |
|
| |
|
| Every round, the cost and stats of a tower are randomised. To view a Towers' stats and abilities, Left-Click it. This will open up its menu. | | Every round, the cost and stats of a tower are randomised. To view a Towers' stats and abilities, Left-Click it. This will open up its menu. |
| | | </div> |
| ===Levels=== | | <div class="hoverbox"> |
| | ==Levels== |
| <tabber> | | <tabber> |
| Trial of the Crystal Guardian= | | Trial of the Crystal Guardian= |
| Line 220: |
Line 220: |
| | 10 || Astaroth, Nebula, Seraphim || 12, 12, 13 | | | 10 || Astaroth, Nebula, Seraphim || 12, 12, 13 |
| |} | | |} |
| </div>
| |
| |-| | | |-| |
| Trial of the Network Guardian= | | Trial of the Network Guardian= |
| Line 248: |
Line 247: |
| | 10 || Astaroth, Nebula, Seraphim || 10, 15, 20 | | | 10 || Astaroth, Nebula, Seraphim || 10, 15, 20 |
| |} | | |} |
| </div>
| |
| |-| | | |-| |
| Trial of the Matrix Guardian= | | Trial of the Matrix Guardian= |
| Line 276: |
Line 274: |
| | 10 || Astaroth, Nebula, Seraphim || 10, 15, 20 | | | 10 || Astaroth, Nebula, Seraphim || 10, 15, 20 |
| |} | | |} |
| | </tabber> |
| </div> | | </div> |
| </tabber> | | <div class="hoverbox"> |
| | | ==Stats== |
| ===Stats===
| |
| <tabber> | | <tabber> |
| Tower Stats= | | Tower Stats= |
| <div class="pre-dungeon"> | | <div class="pre-dungeon"> |
| To defend the objective you get access to various towers. <br> | | To defend the objective you get access to various towers. Their original purchase price is randomized; however, upgrading to T2 costs 75 Coins, and upgrading to T3 costs 150 Coins. Upgrading a Tower can be done by Shift-Clicking it after placing it down. |
| They can be bought for a base price of '''50 Coins''', upgraded to T2 for '''75 Coins''' and upgraded to T3 for '''150 Coins'''. <br>
| |
| Upgrading a Tower can be done by '''Shift-Clicking''' on it after placing it down. <br> | |
| | |
| </div> | | </div> |
|
| |
| <br>
| |
|
| |
|
| <div class="display-items"> | | <div class="display-items"> |
| {{ItemInfobox | | {{ItemInfobox |
| |title=Laser Cannon | | |title=Laser Cannon |
| |images=3DLaserCannonT1.png,T1;3DLaserCannonT2.png,T2;3DLaserCannonT3.png,T3 | | |images=Trial-3DLaserCannonT1.png,T1;Trial-3DLaserCannonT2.png,T2;Trial-3DLaserCannonT3.png,T3 |
| |T1_Desc= Shoots powerful lasers at enemies. | | |T1_Desc= Shoots powerful lasers at enemies. |
| |T2_Desc= Shoots powerful lasers at enemies. | | |T2_Desc= Shoots powerful lasers at enemies. |
| Line 314: |
Line 307: |
| {{ItemInfobox | | {{ItemInfobox |
| |title=Incinerator | | |title=Incinerator |
| |images=3DIncineratorT1.png,T1;3DIncineratorT2.png,T2;3DIncineratorT3.png,T3 | | |images=Trial-3DIncineratorT1.png,T1;Trial-3DIncineratorT2.png,T2;Trial-3DIncineratorT3.png,T3 |
| |T1_Desc= Shoots powerful orbs at the closest enemy. | | |T1_Desc= Shoots powerful orbs at the closest enemy. |
| |T2_Desc= Shoots powerful orbs at the closest enemy. | | |T2_Desc= Shoots powerful orbs at the closest enemy. |
| Line 335: |
Line 328: |
| {{ItemInfobox | | {{ItemInfobox |
| |title=Bombardier | | |title=Bombardier |
| |images=3DBombardierT1.png,T1;3DBombardierT2.png,T2;3DBombardierT3.png,T3 | | |images=Mob-3DBombardierT1.png,T1;Mob-3DBombardierT2.png,T2;Mob-3DBombardierT3.png,T3 |
| |T1_Desc= Fires bombs at the closest enemy. | | |T1_Desc= Fires bombs at the closest enemy. |
| |T2_Desc= Fires bombs at the closest enemy. | | |T2_Desc= Fires bombs at the closest enemy. |
| Line 356: |
Line 349: |
| {{ItemInfobox | | {{ItemInfobox |
| |title=Railgun | | |title=Railgun |
| |images=3DRailgunT1.png,T1;3DRailgunT2.png,T2;3DRailgunT3.png,T3 | | |images=Trial-3DRailgunT1.png,T1;Trial-3DRailgunT2.png,T2;Trial-3DRailgunT3.png,T3 |
| |T1_Desc= Fires concentrated beams that pierces through enemies. | | |T1_Desc= Fires concentrated beams that pierces through enemies. |
| |T2_Desc= Fires concentrated beams that pierces through enemies. | | |T2_Desc= Fires concentrated beams that pierces through enemies. |
| Line 376: |
Line 369: |
| {{ItemInfobox | | {{ItemInfobox |
| |title=Minigunner | | |title=Minigunner |
| |images=3DMinigunnerT1.png,T1;3DMinigunnerT2.png,T2;3DMinigunnerT3.png,T3 | | |images=Trial-3DMinigunnerT1.png,T1;Trial-3DMinigunnerT2.png,T2;Trial-3DMinigunnerT3.png,T3 |
| |T1_Desc= Firest rapid bursts of projectiles. | | |T1_Desc= Firest rapid bursts of projectiles. |
| |T2_Desc= Firest rapid bursts of projectiles. | | |T2_Desc= Firest rapid bursts of projectiles. |
| Line 397: |
Line 390: |
| {{ItemInfobox | | {{ItemInfobox |
| |title=Alchemist | | |title=Alchemist |
| |images=3DAlchemistT1.png,T1;3DAlchemistT2.png,T2;3DAlchemistT3.png,T3 | | |images=Trial-3DAlchemistT1.png,T1;Trial-3DAlchemistT2.png,T2;Trial-3DAlchemistT3.png,T3 |
| |T1_Desc= Slows enemies and deals minor damage | | |T1_Desc= Slows enemies and deals minor damage |
| |T2_Desc= Slows enemies and deals minor damage | | |T2_Desc= Slows enemies and deals minor damage |
| Line 415: |
Line 408: |
| Whilst in combat, every 4 seconds this tower will summon 4 projectiles that fly into the air then home into the nearest enemy, each dealing 6 damage. It can do this to 2 enemies at once. | | Whilst in combat, every 4 seconds this tower will summon 4 projectiles that fly into the air then home into the nearest enemy, each dealing 6 damage. It can do this to 2 enemies at once. |
| }} | | }} |
| </div>
| |
| |-| | | |-| |
| Mob Stats= | | Mob Stats= |
| <div class="pre-dungeon">
| |
| I love orzek <br>
| |
| every kill in crystal tower defense is 5 gold <br>
| |
| every kill in track tower defense is 3 gold <br>
| |
| Nebulas also give attack cd reduction and dmg boost the cooldown of heal is shared for all these and its random which one it chooses
| |
| Heart particles -> heal 100 all things said before
| |
| Flame particles -> cdreduction 0.15s 1s between getting buffs lasts 1sA
| |
| Soul fire flame particle -> dmgamp mostly 20% but nebula itself gets 33.3% cuz 3 dmg and just gets 1 more dmg
| |
| All these buffs have 2.5 range
| |
|
| |
| </div>
| |
|
| |
| <br>
| |
|
| |
| <div class="display-items"> | | <div class="display-items"> |
| {{ItemInfobox | | {{ItemInfobox |
| |title= Eddie | | |title= Eddie |
| |images=3DEddie.png,Regular;3DEddie.png,Crystal | | |images=Boss-3DEddie.png,Regular;Boss-3DEddie.png,Crystal |
| |Desc= Silly Pirate from Beach here to ruin your day! | | |Desc= Silly Pirate from Beach here to ruin your day! |
| |Regular_Velocity= 4 | | |Regular_Velocity= 4 |
| Line 445: |
Line 423: |
| {{ItemInfobox | | {{ItemInfobox |
| |title= Ashenclaw | | |title= Ashenclaw |
| |images=3DAshenclaw.png,Regular;3DAshenclaw.png,Crystal | | |images=Boss-3DAshenclaw.png,Regular;Boss-3DAshenclaw.png,Crystal |
| |Desc= Silly Kobold from Crimson Forest here to ruin your day! | | |Desc= Silly Kobold from Crimson Forest here to ruin your day! |
| |Regular_Velocity= 5 | | |Regular_Velocity= 5 |
| Line 455: |
Line 433: |
| {{ItemInfobox | | {{ItemInfobox |
| |title= Astaroth | | |title= Astaroth |
| |images=3DAstaroth.png,Regular;3DAstaroth.png,Crystal | | |images=Boss-3DAstaroth.png,Regular;Boss-3DAstaroth.png,Crystal |
| |Desc= Silly Guy from Crimson Cathedral here to ruin your day! | | |Desc= Silly Guy from Crimson Cathedral here to ruin your day! |
| |Regular_Velocity= 12 | | |Regular_Velocity= 12 |
| Line 465: |
Line 443: |
| {{ItemInfobox | | {{ItemInfobox |
| |title= Nebula | | |title= Nebula |
| |images=3DNebula.png,Regular;3DNebula.png,Crystal | | |images=Boss-3DNebula.png,Regular;Boss-3DNebula.png,Crystal |
| |Desc= Silly Archmage from Rustborn Kingdom here to ruin your day! | | |Desc= Silly Archmage from Rustborn Kingdom here to ruin your day! |
| |Regular_Velocity= 4 | | |Regular_Velocity= 4 |
| Line 471: |
Line 449: |
| |Crystal_Velocity= 1.8 | | |Crystal_Velocity= 1.8 |
| |Crystal_Health= 600 | | |Crystal_Health= 600 |
| |Regular_Ability= (Heal=100 can't heal self , healing cooldown 0.75s(how often CAN get healed) cooldown=<random.float.1.6to2>)
| |
| |Crystal_Ability= (Heal=100 can't heal self , healing cooldown 0.75s(how often CAN get healed) cooldown=<random.float.1.6to2>)
| |
| }} | | }} |
|
| |
|
| {{ItemInfobox | | {{ItemInfobox |
| |title= Seraphim | | |title= Seraphim |
| |images=3DSeraphim.png,Regular;3DSeraphim.png,Crystal | | |images=Boss-3DSeraphim.png,Regular;Boss-3DSeraphim.png,Crystal |
| |Desc= Silly Celestial from ??? here to ruin your day! | | |Desc= Silly Celestial from ??? here to ruin your day! |
| |Regular_Velocity= 3 | | |Regular_Velocity= 3 |