|
|
| (10 intermediate revisions by 3 users not shown) |
| Line 1: |
Line 1: |
| | __NOTOC__ |
| | <div class="dungeon-page"> |
| {{NPCInfobox | | {{NPCInfobox |
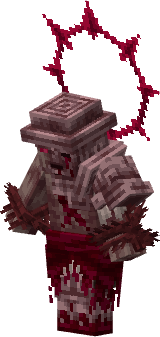
| | title = Raphael;The Sanguine Lord | | | title = Raphael;The Sanguine Lord |
| | image = 3DRaphael.png;RaphaelBossBar | | | image = Boss-3DRaphael.png;Bossbar-Raphael |
| | Health = 13200 | | | Health = 13200 |
| | Fame = 3000 | | | Fame = 3000 |
| | | Glory = 3000 |
| | Tiered = 11 | | | Tiered = 11 |
| | Bloodshot = | | | Companion = Pets;Exaltling;Pet-2DExaltling.png;0.2, |
| Loot; Crimson Sourcestone; Item-CrimsonSourcestone.png; 1.5, | | Mounts;Celestial Serpent;Mount-2DCelestialSerpent.png;0.2 |
| Weapons; Calamity; Ut-Calamity.png; 0.15, | | | Bloodshot = Loot;Crimson Sourcestone;Item-CrimsonSourcestone.png;0.75, |
| Weapons; Retribution; Ut-Retribution.png; 0.15, | | Weapons;Calamity;Ut-Calamity.png;0.15, |
| Weapons; Rapture; Ut-Rapture.png; 0.15, | | Weapons;Retribution;Ut-Retribution.png;0.15, |
| Weapons; Martyr; Ut-Martyr.png; 0.15, | | Weapons;Rapture;Ut-Rapture.png;0.15, |
| Weapons; Reikon; Ut-Reikon.png; 0.15, | | Weapons;Martyr;Ut-Martyr.png;0.15, |
| Weapons; Malice; Ut-Malice.png; 0.15, | | Weapons;Reikon;Ut-Reikon.png;0.15, |
| Armours; Wrathguard; Ut-Wrathguard.png; 0.15, | | Weapons;Malice;Ut-Malice.png;0.15, |
| Armours; Bloodstrider; Ut-Bloodstrider.png; 0.15, | | Armours;Wrathguard;Ut-Wrathguard.png;0.15, |
| Armours; Rueforge; Ut-Rueforge.png; 0.15 | | Armours;Bloodstrider;Ut-Bloodstrider.png;0.15, |
| | Companion = | | Armours;Rueforge;Ut-Rueforge.png;0.15 |
| Pets; Exaltling; 2DExaltling.png; 0.2,
| | | Frag = Bloodshot;50 |
| Mounts; Celestial Serpent; 2DCelestialSerpent.png; 0.2
| | | Required = 60 |
| | Rune =
| | | Solo = 66 |
| Rune; Rune Of The Fallen; Rune-Fallen.png; 3
| |
| | Required = 62 | |
| | Solo = 72 | |
| }} | | }} |
|
| |
|
| <div class="hoverbox"> | | <div class="hoverbox"> |
| == Dungeon Data ==
| | The ‘’’Raphael’s Chamber’’’ is a 60 [[Game Mechanics#Tier Points|Tier Point]] [[Dungeons|dungeon]] — the last bastion of Raphael’s Castle, and in it resides Raphael himself, ruled by ‘’’Raphael, The Sanguine Lord’’’. |
| Raph’s Chamber is the last bastion of Raph’s Castle, and in it resides Raphael himself.
| |
|
| |
|
| This dungeon is dropped by completing [[Raphael's Castle]]. | | This dungeon is dropped by completing [[Raphael’s Castle]]. |
| </div> | | </div> |
|
| |
|
| Line 46: |
Line 45: |
| '''(Set 2, Attack 1)''' | Raphael summons slow-rotating laser beams around the arena that damage and stun players on contact. He also scatters mines across the arena floor that explode and deal damage. | | '''(Set 2, Attack 1)''' | Raphael summons slow-rotating laser beams around the arena that damage and stun players on contact. He also scatters mines across the arena floor that explode and deal damage. |
|
| |
|
| '''(Set 2, Attack 2)''' | Raphael drives crimson swords into the floor, dividing the arena into multiple sections with barriers black blocks. Random sections will contain crimson swords that land from the sky which deal AoE damage to any players who stand in them. Raphael then rolls twice toward the player, summoning projectiles that accelerate as he rolls. After the rolls, the lines dividing the arena disappear and the pattern repeats three times. | | '''(Set 2, Attack 2)''' | Raphael drives crimson swords into the floor, dividing the arena into multiple sections with barriers of black blocks. Random sections will contain crimson swords that land from the sky which deal AoE damage to any players who stand in them. Raphael then rolls twice toward the player, summoning projectiles that accelerate as he rolls. After the rolls, the lines dividing the arena disappear and the pattern repeats three times. |
|
| |
|
| '''(Set 3, Attack 1)''' | Raphael marks a player, leaps into the air, and dives down on the target. Each time Raphael hits the ground, he summons five waves of mines in all directions. He repeats this three times. | | '''(Set 3, Attack 1)''' | Raphael marks a player, leaps into the air, and dives down on the target. Each time Raphael hits the ground, he summons five waves of mines in all directions. He repeats this three times. |
| Line 82: |
Line 81: |
| |img= | | |img= |
| |content= | | |content= |
| '''Dialogue''' | | <tabber> |
| *Coming soon
| | English Dialogue= |
| | {| class="wikitable" |
| | |+ Bossfight |
| | |- |
| | ! Trigger !! Dialogue |
| | |- |
| | | Arrival || [Raphael] "I take it that the twins are dead. Then it is time, end this-" {{Sound|VA-Raphael'sChamber1.ogg}} <br />[Asmodeus] "HAHAHAHA. Fraternising with the enemy, Raphael?" {{Sound|VA-Raphael'sChamber2.ogg}} <br />[Asmodeus] "It’s a shame. But it seems I must crush your hope once more!" {{Sound|VA-Raphael'sChamber3.ogg}} |
| | |- |
| | | Phase 1 End || [Asmodeus] "You have proven your worth, warriors. Alas, the Celestials have no need for loose ends." {{Sound|VA-Raphael'sChamber4.ogg}} |
| | |- |
| | | Phase 2 End || [Asmodeus] "But perhaps, I could use a new host. This old fool has been problematic indeed." {{Sound|VA-Raphael'sChamber5.ogg}} |
| | |- |
| | | Phase 3 End || [Asmodeus] "YOU STILL RESIST, RAPHAEL? I COMMAND YOU TO OBLITERATE THEM." {{Sound|VA-Raphael'sChamber6.ogg}} |
| | |- |
| | | Phase 4 End || [Asmodeus] "To think you’d protect the ones who felled Loa. You really are pathetic, Sanguine Lord." {{Sound|VA-Raphael'sChamber7.ogg}} |
| | |- |
| | | Phase 5 End || [Raphael] "This is the way my life ends." {{Sound|VA-Raphael'sChamber8.ogg}} <br />[Raphael] "This is the way your reign ends. With a bang, not a whimper." {{Sound|VA-Raphael'sChamber9.ogg}} <br />[Asmodeus] "YOU END YOUR REIGN A COWARD. A TRAITOR ON BOTH ENDS." {{Sound|VA-Raphael'sChamber10.ogg}} <br />[Raphael] "No. Surrounded by worthy warriors, my legacy shall be cleansed of blood." {{Sound|VA-Raphael'sChamber11.ogg}} <br />[Asmodeus] "My powers.. You senile fool!" {{Sound|VA-Raphael'sChamber12.ogg}} <br />[Raphael] "Fledgling warriors. Live well. Fight well. Die well." {{Sound|VA-Raphael'sChamber13.ogg}} <br />[Asmodeus] "I won't let you..." {{Sound|VA-Raphael'sChamber14.ogg}} <br />[Raphael] "I had chains... But now..." {{Sound|VA-Raphael'sChamber15.ogg}} |
| | |- |
| | | Boss Death || [Raphael] "I'M FREE!" {{Sound|VA-Raphael'sChamber16.ogg}} <br />[Raphael] "Finally…silence…what a beautiful melody…" {{Sound|VA-Raphael'sChamber17.ogg}} <br />[Raphael] "Telos will be ours..." {{Sound|VA-Raphael'sChamber18.ogg}} |
| | |} |
| | </tabber> |
| }} | | }} |
| </div> | | </div> |
| Line 92: |
Line 111: |
| <div class="tipstricks"> | | <div class="tipstricks"> |
| * For the 'Memorise' phase, stand near the edges of the arena as there will be a fewer amount of lines compared to the middle. | | * For the 'Memorise' phase, stand near the edges of the arena as there will be a fewer amount of lines compared to the middle. |
| * During the crimson swords phase, you can stand in the center and keep jumping. This will minimize the damage taken while allowing you to DPS Raphael more effectively. If Raphael targets you, make sure to move left or right; otherwise, you will take massive damage. | | * During the crimson swords attack, you can stand in the center and keep jumping. This will minimize the damage taken while allowing you to DPS Raphael more effectively. If Raphael targets you, make sure to move left or right; otherwise, you will take massive damage. |
| * When Raphael places his first set of tridents, be very careful. There is a small safe spot in the middle of the four tridents where you can DPS him without being hit. However, during the second set of tridents, there is no safe spot, so retreat immediately. | | * When Raphael places his first set of tridents, be very careful. There is a small safe spot in the middle of the four tridents where you can DPS him without being hit. However, during the second set of tridents, there is no safe spot, so retreat immediately. |
| * In the final phase, Raphael becomes fully invulnerable. Equip full EHP gear with a healing pet (if you have one) and look away from Raphael. This will make it easier to jump over the black circles. | | * In the final phase, Raphael becomes fully invulnerable. Equip full EHP gear with a healing pet (if you have one) and look away from Raphael. This will make it easier to jump over the black circles. |
| </div> | | </div> |
| | </div> |
| | |
| </div> | | </div> |
|
| |
|
| {{Dungeon Navbox}} | | {{Dungeon Navbox}} |